Table of Contents
B8 flight stick
Summary
The B-8 / MC-2 Grip has become the most popular control grip in aviation. This grip has seen action in fixed-wing aircraft such as the A-10, and rotary-wing aircraft manufactured in the United States and abroad.
It is a fully operational remix of a very nice B8 grip replica, originally by schrodingers_cat from Thingiverse. The trigger has two positions: half-press (intercom) and full-press with a click (radio push to talk). When the trigger is fully pressed, a half-press button is disabled by the software, so your sim will see these two positions as entirely separate buttons.
You will need:
- 1 x Arduino pro mini board
- 1 x KY-023 joystick module
- 3 x PBS-11B buttons
- 1 x PBS-10B-2 button (trigger intercom)
- 1 x 12x12x4.3mm TS-1202 button (https://goo.gl/mjpt6T) (trigger PTT)
- some wires
- 1 x M8 x 60 bolt and nut
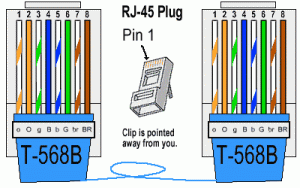
- 1m of UTP-5e cable
- 1m of 10mm aluminum square pipe
- 6 x m3x20 screws and nuts
- 1 x m3x40 screw for trigger mounting
- 1 x Simchair MKIV master controller
- 1 x Simchair MKIV cyclic base
- Hot glue gun
Repository path
Available mods
None, so far.
Special features
- hotplug support- you can detach and re-attach stick mid-flight
- sensitivity switching with hat switch button (extreme precision mode)
- force trim toggle button (the top one by default), emergency trim release (with a hat switch button click)
- 2-way realistic intercom/push to talk switch, half-press toggles intercom, full-press (click) toggles push-to-talk
- “push-to-talk sends a keyboard key” option, handy if your external radio work through TeamSpeak
- hat switch can be used to make precise adjustments to the cyclic position while trimmed or as a regular hat switch
Assembly
The assembly pretty much consists of joining the halves together, when finished with electronics, and putting a trigger on after that. At first, we need to solder wires to PBS-11B buttons and insert them into their sockets. Bend their legs as shown in the picture below, then solder wires to the innermost areas of contacts (so wires won't be damaged when you will be inserting the button into its socket): Bend legs of all PBS buttons like this

To fit the KY-023 module into the stick, we need to cut off its upper left corner (no worries, there’s nothing useful there :D). Cut off the upper left corner of the KY-023 board

Connect everything as shown in the “Electronics” section below. Here’s how the result should look like:

PTT TS-1202 button is glued with hot glue to the left half part just under the PBS-10B2 tip, which is glued into the trigger (adjust its position so the PBS-10 button tip will push to the center of it). If you like, you can also use a spring from the PBS-26 button - put a nut onto the PBS-10B2 button, fix it with a tiny drop of hot glue, and put the spring between PBS-10B2 and TS-1202 buttons.

Fix wires with hot glue (make sure screw holes are not covered with wires!), add some glue to an ethernet cable. After joining halves of the stick together and tightening (be gentle!) screws, attach a trigger with an m3x40mm screw. Insert the screw to around 80%, add a small drop of hot glue to fix it in place, insert it fully, wipe any leftover glue with a paper towel (use a knife if needed, hot glue can be removed easily). Put an M8 washer and a nut on a bolt that protrudes from the bottom of a stick.
Adjust stick height to your liking, cut the aluminum pipe accordingly, then route an ethernet cable through the pipe and crimp it as a regular ethernet cable.
Here’s how assembled stick looks:


Stick frame (IKEA GUNDE chair)
After the grip is assembled, it’s time to assemble a stick frame for it.
You will need:
- 1 x M8x140mm bolt
- 2 x M8x200mm bolts
- 2 x M8x70mm bolts
- 2 x M8x24mm coupler nuts
- 15 x M8 nuts
- 1 x M8 cap nut
- 1 x PBS-26B button


Alternatively, you can just mount your cyclic gimbal to the floor and use 2 M8 threaded rods to connect the stick grip.
Electronics
Connect buttons and the pot board to an Arduino as follows:
POT BOARD VCC            -> PIN 10
POT BOARD GND            -> Arduino GND
POT VRx                  -> A0
POT VRy                  -> A1
POT BOARD BUTTON         –> PIN 2
TOP BTN (TRIMMER)        –> between PIN 3 and GND
MIDDLE BTN(FIRE)         –> between PIN 4 and GND
BOTTOM BTN               –> between PIN 5 and GND
TRIGGER INTERCOM         –> between PIN 6 and GND
TRIGGER PTT (full press) –> between PIN 7 and GND
A4(SDA)                  -> ethernet cable blue wire
A5(SCL)                  -> ethernet cable green-white wire
VCC                      -> ethernet cable orange-white wire
GND                      -> ethernet cable orange wire
Rx                       -> ethernet cable blue=white wire
Tx                       -> ethernet cable green wire
DTR                      -> ethernet cable brown-white wire
After soldering everything, put the Pro Mini board into its socket, organize wires, put an M8x75 bolt with a nut into its place, and finally screw the halves together.
