
I have been testing the new gimbal for a while now, and while it worked very well, 2 things were not perfect:
1)bolts were getting loose over time, resulting in parts turning along them relatively to each other, requiring constant adjustments.
2) there was no mechanical spring tension adjustment, so no mechanical way to center the gimbal with a long and heavy stick
I have fixed the first issue by adjusting some tolerances (that were too big in some parts), adding thread locker in certain places (the manual is updated accordingly) and redesigning the stick frame.
I have tried a few different designs of adjustable spring holders, and finally came up with this one, which I called the “Star Destroyer” because of its look =)
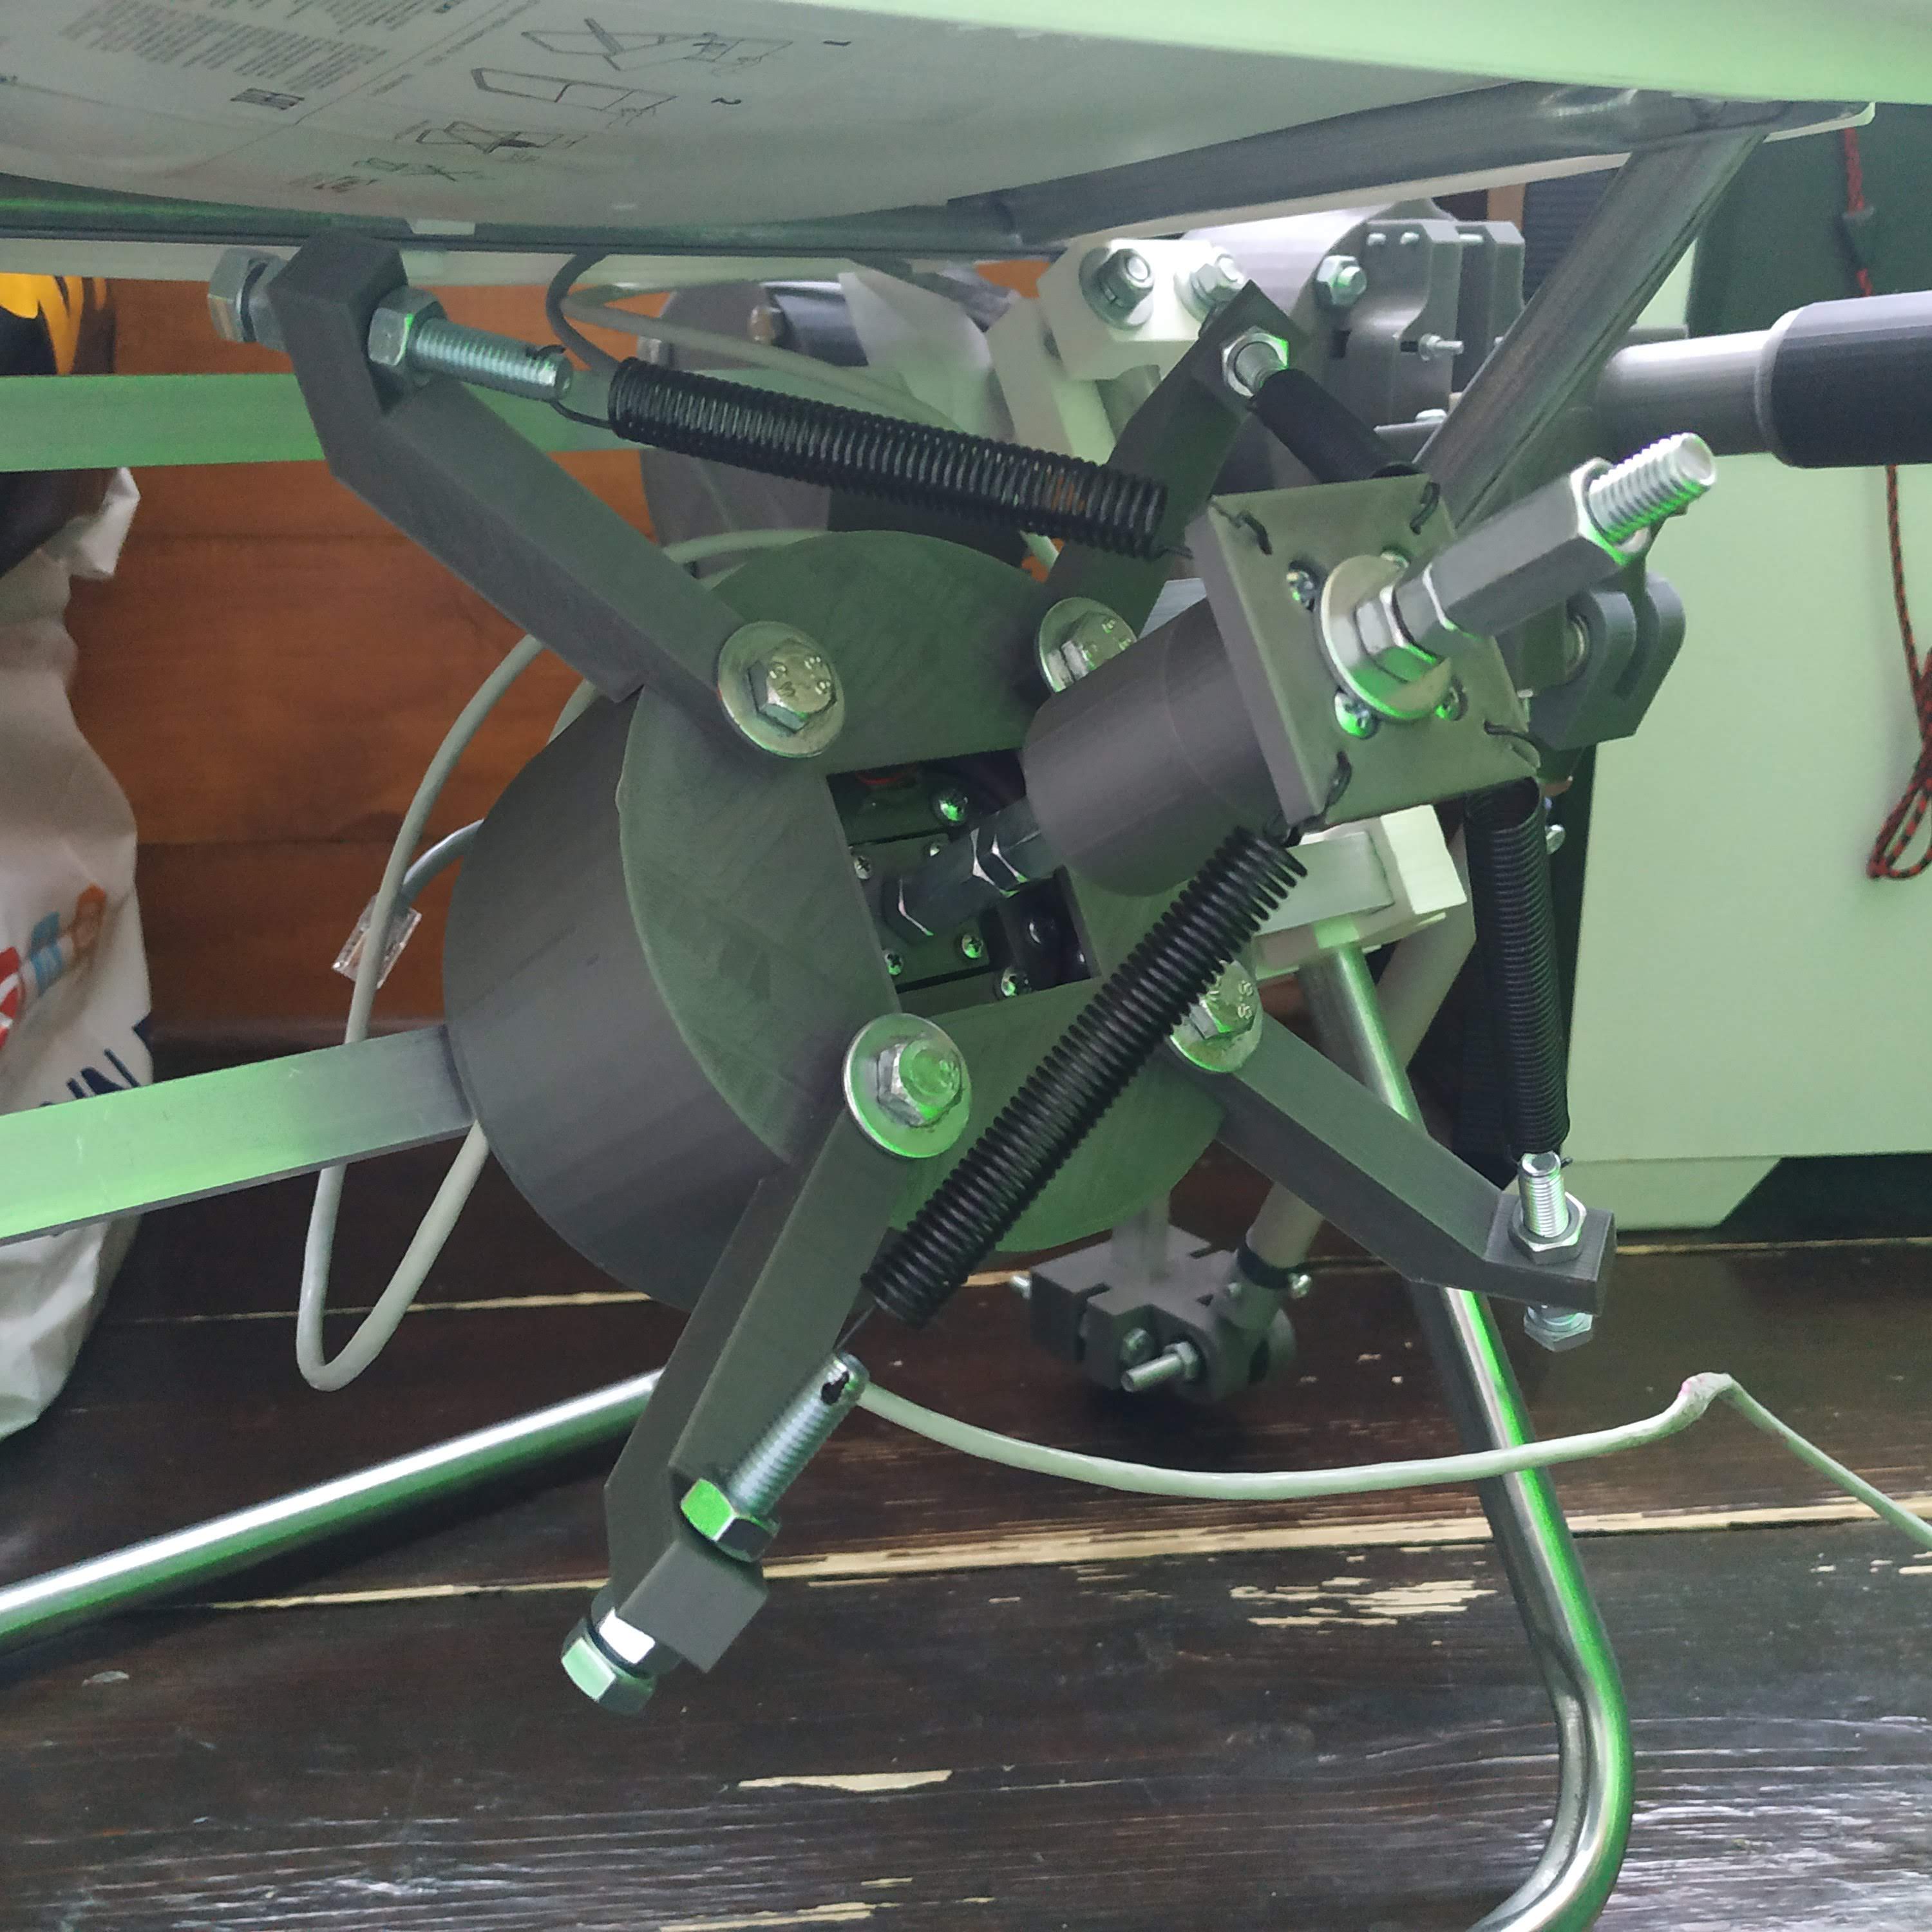
I liked how smooth it is in flight, I’ve been able to center the stick perfectly, adjusting spring holders, parts won’t turn sideways so far.
I decided to make a test flight at fully linear controls setting in XPlane, with 100% firmware sensitivity mode, in the wind to test the precision of the gimbal, and liked the result!
Typically I would use 80% firmware sensitivity (extreme precision mode) along with 10% curve in XPlane, so cruising would require less concentration, to be able to enjoy the surroundings in VR, so that’s why there’ve been kinda weird attitude change when i tried to show force trim in cruise flight. Muscle memory, you know =)
New spring holders require drilling holes in bolts, so I have designed a printable drill guide tool for that.
I will be updating repositories tomorrow after additional testing.
Looking great!
Merry Christmas
Thanks
Thanks mate, happy Christmas to you too!
( although in the land of Ushankas and bears we celebrate it on Jan 7th, but still 😀 )
Alexey, you’re a genius. I want to make all of this. It’s what I have been looking for for years. And it seems like it’s easy to collapse and put away when I have to use the space for other purposes. Like using my DAW and keyboard.
Will the simchair setup work with my old FSX setup? I have an old pc which was built to state of the art six years ago. It has gotten outdated and I can’t run XP11 or the last updates for P3D. I can’t afford to build myself a new one at the moment but I won’t let that stop me from learning how to fly the helicopter.
Kind regards
Hans J.
Thank you for your kind words, Hans!
Simchair will work with any simulator, along with its special features (they are firmware-driven). If you decide to go IKEA GUNDE way, that’s what I use for my work chair as well. The stick can be removed in less than a minute, then it’s a regular chair (the collective is still there though, but it doesnt interfere with using your computer when not flying in any way =) ). It can be dissasembled completely in something around 10 minutes, but I would have been too lazy to do it every time =) It’s been a while since I’ve spooled that dodo 206 for the last time, but there’s nothing that can’t be fixed should any problems occur =)
Btw, whats your PC specs? It can be, that you just need a more or less modern video card and a smartphone to try running xplane in VR. I can also recommend trying DCS (free version includes really great TF-51, if it runs ok, their Huey is the best you can find). More of a recreational flying, but with probably the best flight model available.
Cheers!
Hi again, Alexey.
We actually do have a couple of IKEA Gunde chairs that we use as extra chairs when we have more people over for dinner than we have dinner table chairs. You’re right, it can be used as an ordinary work chair too. It’s just me working in offices for so many years that I always think office chairs with office desks out of habit.
My PC setup is: An i7 3770k cpu, 32 GB ram, 120 GB ssd cache between the system and the hard drives, 3GB AMD Radeon HD 7970, Ghz edition.
Need to use AMD cards to be able to output FSX and games in 5 screen Eyefinity wide screen. I have five 24” screens set up in portrait mode . Nvidia doesn’t support that many screens, for some reason.
Actually I have two 7970s in crossfire. Bu that’s just for games that support crossfire. Doesn’t do anything to help performance in FSX. Doesn’t hurt it either, so that’s fine. Gigahertz edition overclocks compared to the standard edition.
Another name for the AMD Radeon HD 7970 is R9 280X. They just changed the name on it when they introduced the R9 series. The specs are the same.
“https://www.videocardbenchmark.net/gpu.php?gpu=Radeon+HD+7970+%2F+R9+280X&id=51“
Here’s a comparison sheet showing how it keeps up with the competition today:
“https://www.techpowerup.com/gpu-specs/radeon-hd-7970-ghz-edition.c365”
The setup flies beautifully with FSX with Orbx PNW, REX and some other add ons, plus TrackIR. Going to get the Dodo 206 too.
The 7970 should be able to run Direcx 12 from what I see but I wonder about the video ram.
Will 3GB be VRAM be enough for VR on the phone. I see LR recommending at least 4GB VRAM for ordinary screen use. Still, on a flightsim I don’t need 60 to 90 fps. It works fine with around 30 from my experience.
When it comes to phone I have an iPhone 8. Not plus.
Will this be good enough to run VR on the phone and how do I do it. And what VR phone headset should I get to use with it?
Regards
Hans Jørgen
Wow, that’s quite a setup! Your CPU is fine for xplane, just get it running at its peak frequency. With VR you will only be drawing 2 pictures at a time, so your fps may actually increase! 32gb RAM is more than enough. If you buy something like gtx1080ti, you should be fine with running modern games at maximum settings! I am getting around 40 fps out of humble 970 gtx with a slightly newer CPU (which is mainly used by autogen) and 16gb RAM with ortho4xp photo scenery, and around 60 without it, I guess.
About VR, try running ivry app via USB tethering. This app has a free trial, it becomes black and white in 5 minutes, otherwise, full functionality. BoboVR Z4 headset is quite good, though I have a phone with 6″ screen. Anyway, I am quite sure once you try it, you’ll never need those 5 monitors again, even with all smartphone vr limitations, like, not as crisp picture as an ordinary screen =) Oculus rift should be much better, but to get an idea for almost free, smartphone VR is fine. I only fly with a monitor to film demo videos now, it just doesn’t feel right anymore, because depth perception is everything. The only thing, I had to adjust headset mechanically to fit my eyes and do a couple of flights (you can experience slight discomfort at first).
Some people write about being nauseous due to low fps in VR, just remember, your head is a joystick, you use it to control view axes, do gentle movements and everything will be fine.
The only issue with VR I have now is having to use pdf VFR maps with a special plugin for xplane so I won’t be seeing my position on them, they are slower than usual maps.
IKEA GUNDE chair with MALINDA pillows mod is quite comfortable and yet very portable (I’ve been breaking the default plastic back once in a few months, but rigid aluminum frame prolongs its life noticeably), its almost like a small armchair. You can also experiment with an angle of inclination of the back a bit =)
Cheers!
Wow! That was good news!
Here I was sobbing quietly to myself, thinking I had to spend 15-20 000 NOK to upgrade both the MB, CPU, RAM and Graphics card to be able to run Xplane 11. PLUS the investment in VR glasses. If I wanted to go the VR way, and who doesn’t?
And that is something I totally can’t afford right now.
Now you tell me I get away with upgrading just the graphics card. And I need to do that that only if I want to run max FPS with the newest games. Or if I get my hands on an Oculus Rift. What a relief! You made my day Alexey.
I don’t think I will react to the 30 fps. My five screen setup is locked to 30 fps, just to make sure everything runs without stutters with all the add ons active. And I have ben using TrackIR for years. So the only difference would be that I get a 1:1 relationship between head movement and change of view. I think I will be fine.
I should be able to clock the CPU pretty good. That’s why I got the 3770k in the first place. I’ve got an ASUS P8Z77-V PRO, Socket-1155 motherboard with good overclock support, and I have a Noctua NH-D15 to keep the CPU within temperature limits.
Btw. Never buy those all in one water cpu coolers. I had to get the Noctua when my Corsair H100 sprung a leak in the radiator and sprayed everything inside the cabinet with coolant. Luckily nothing bad happened to the electronics, but I had quite a job cleaning it up.
The irony of it all is that if I had gotten the Noctua in the first place that would not have happened and I would have had a better CPU cooler. The Noctua crushes the H100 in tests. Wish I had known that before.
Oh, well. I just got seduced by the thought of an easy way to get water cooling. Because water cooling was the latest buzzword. Money wasted and lesson learned.
It seems like I have to order the BoboVR Z4 from China. Bummer, I wanted to try it today. I can always get another from a local store but I came across reviews that puts BoboVR on top amongs VR glasses for smartphones. So I guess I will just have to be patient.
In the mean time. How do you make use of the Ivry app with the SW? I am a total novice when it comes to VR, so I apologize if it’s a stupid question.
Regards
Hans Jørgen
Well, to be honest, your video card might be an issue, as xplane is known for not working well on ATI cards. Yet, it’s definitely worth trying! Maybe, for a start, try flying either with ortho and without autogen (have to stay at least 2000 feet AGL for it to be tolerable and in fact beautiful, especially in VR) or with medium autogen and stock scenery (can’t imagine flying without ortho anymore though), and look at FPS. Flying in rural areas helps a lot as well, you can also try disabling AI aircraft (they are weird anyway, better try flying online!). Your CPU should be able to handle things just fine (for now, single core performance is what matters mainly).
Also, try DCS, it should run just fine! You’ll love the Huey, everyone does =) Mi-8 is also great. One of the guys who’ve made these choppers actually flew them – went to the USA for the Huey ride, and have been flying the Mi-8 for the military in his younger days. VR support is also there, and FPS will be better.
Not sure what you mean by SW, but to use the app, you install it on the phone, and the driver on your pc, then attach the phone with USB cable and enable USB modem in settings (I really hope that iPhone can do that as well as android!). Then you start ivry app on the phone and launch steamvr, that’s it! It will be recognized as a native steamvr device from now on.
If an iPhone can’t do USB tethering, that’s bad, but you should do fine with a 5Ghz wifi network. Expect a slight latency increase though. Btw, you can try using your head tracker with VR, as it’s actually better (it’s only a gyroscope that seems to be used in a phone, and it drifts over time, have to re-center it often). But to simplify things I just assigned “center view” button to my collective head switch =)
I am a bit afraid of using water cooling, for now, spilled a beer on my video card once lol =) But maybe I will someday.
Yes, I guess the video card might bean issue. The annoying thing is that from my research since we last spoke here it’s just a matter of video RAM. From what I have learned Xplane 11 is basically the same single core, Open GL based, not very efficient when it comes to GPU utilization as it has always been. It’s just gotten more demanding textures that requires more VRAM. So my 3 Gig VRAM is no longer enough.
Still, I might try it, based on that I am not running 1440p but 1080p screens. Their frequency is 60 Hz so anything faster than is a non issue, We’ll see.
Since my last post I have tried to upgrade one of the system disks from Win 7 pro to Win 10 pro, using the MS free upgrade. Yes, it still works. Yay! If it hadn’t I would have to use a MSDN license but I wanted to see if it worked, just because.
It took some effort as I first tried to upgrade to the latest Radeon drivers and got a blue screen. That corrupted my system so much that the setup gave in on the last pass and rolled back to the original OS. I tried to fix it by installing Win 8 instead. And then I got the Metro gui and quickly I decided that I would get the Win 10 gui, even if it killed me.
I still couldn’t upgrade from 8 though. The solution was to run DISM /Online /Cleanup-Image /RestoreHealth. After that the upgrade to Win 10 pro worked as a charm.
Now I am going to reinstall Steam and Steam VR, plus DCS and get the Xplane 11 demo. I got a little bit fed up while I was swearing over the upgrade trouble so I need a little break from pc setup. Probably do it over the weekend.
I am also going to look around town for people with a 3D printer that could help me print the parts. I guess it would be a good thing if I could give them an estimate on how much material it would take for each of the controls. Do you have an estimate I could give them?
Another thing I wondered about is how you manage to get the precision on the cyclic that you show in the youtube video? I see from the forums that other builders have to use gears or levers between the gimbal and the magnet holder to make the movement of the magnet bigger than the stick movement to get the neccesary movement resoulution.
Does it come down to the type of Hall sensor or to the way you utilize the electronics and firmware?
I have also got a cheapo VR headset for my phone. Just paid 50 NOK for it, used. Probably just been taken out of the box once. Before I screwed up the PC setup and had to upgrade and clean it I managed to test iVry and it seemed to work with Steam VR. And it thethers via USB. I am going to do some more testing when I have gotten it up and running fully again.
I also plan to try it out on FSX with FlyInside. I guess I still need to use Steam VR as the VR server so I guess I’ll get FSX for Steam instead of screwing up my already true and tested FSX setup. That one resides on an airgapped Win 7 Pro installation, on it’s own harddrive. That one is never on the net. Just to make sure as few processes as possible is running while I fly. Including removing the anti malware overhead.
BTW. I am wondering about getting my own 3D printer. I am turning 55 in a few months and that might be an excuse. My wife is an artist and she looked very closely at one we saw in a local store a few months back, so she may be persuaded. You never know until you’ve tried.
The printer we looked at was the FlashForge Finder 2.0. Is that a suitable one for this kind of printing? I know next to nothing about 3D printers so I prefer to ask people like you, rather than throwing money out the window by buying something that’s not good.
I figured if I got it for my birthday I could start off with the parts for the Simchair as my first project and also be able to print the upgrades, as you refine the construction.
Still. 4500 kroner is a lot of money, so I might be better off making contact with someone who already have one and would be willing to print for me if I cover the material expenses and a little fee for the work. We’ll see.
And oh, I went out to our garage to see if I could find our Gunde chairs but after the last cleaning things have been changed around so much that I guess I’ll have to wait until my wife returns to find them. She always knows where our stuff is stored.
That’s all for now. Looking forward to hearing from you again.
Cheers
Hans Jørgen
Hi Hans!
Yup, system upgrade/licensing issues is always a pain =)
About precision, its a combination of hardware, software and electronics.
The Hall effect sensor is quite common in joystick applications, it’s a good one, but you have to have a proper mechanics to use it: it’s really sensitive to backlash. So, there are probably a few things:
1) Hall sensor frame in which axes rotate was designed specially for this sensor with particular distance between magnet and sensor.
2) Parts are designed for jitter-free operation, which is very important for HE sensors
3) Parts are designed for use with longer sticks, thus there is smaller stick travel range and very high default sensitivity. Much more sensitive than a regular joystick.
4) 15-bit external ADCs are used in cyclic and pedals, thats up to 64000 points per axis, we can truncate it to reduce jitter and provide software filtering without slowing things down (its configurable in master controller firmware), but I prefer using all of its available range.
5) In firmware, we have a special increased precision mode, where full range of an ADC is mapped to the reduced axis range. This limits maximum and minimum axis values, but gives better precision around its center. For helicopters this can often be useful (I fly XPlane DF 407 at 80% linear precision setting). It can be switched at any time with a B8 stick grip hat switch button press.
6) When using springs, pseudo force trim support. Fighting spring tension reduces precision, both in real life and simulators.
7) When using springs, no “center” position of the stick. The center is where the stick is trimmed at, just like in a real helicopter. Thus, no physical indication when passing center, and no jitter related to it (that’s why sim heli pilots often remove springs from their joysticks).
Also, everything is very configurable and can be tuned to every possible use case =)
Printing the helicopter set with one of collective levers should take something around 5 or 6 spools of filament, let me know how much they’ll ask for this =) I can print parts for you in a proper way, probably cheaper than them, but time might be an issue.
Flash finder can be a bit small, that’s a problem. 140x140x140 build volume is even less than a standard 200x200x200 (which is also small!)
Getting your own printer is a great idea, as for which one to choose, I like my p3steel. Get an open source one: you can start with a cheap Chinese machine (Prusa i3 clone), then upgrade it to your liking. You will always have spare parts supply, no matter from what. You can hook pretty much anything to an open source printer with open source firmware. Want it cheap? Ok. Want bed auto leveling? Ok. Want to replace threaded rods or bearings for more advanced? No problem. Want better electronics? It’s possible. Need to change that hot end to the one you can find locally? Again, no problem. Want a bigger print volume? The stretched frame is there to help. Hell, you can even change the frame completely! Any part is interchangeable with others. You can get it up and running almost always, whatever happens with it. Also, no such thing as “oops, it won’t print anymore, I am not sure what happened with it”, you will know exactly how to fix everything =)
You can look at something like Anet A6 for a start, but if you can find p3steel frame locally, its the best one. You can just buy a frame and order an electronics kit from Aliexpress. It will cost a LOT cheaper than buying an assembled printer (maybe even cheaper than ordering printing of simchair parts locally), and it will bring you a lot of joy. Assembling a printer is a cool project by itself, I totally recommend getting into it =)
Btw, if you have some guys who can cut 3mm steel around, you can get yourself a p3steel frame: its open source!
Simchair models are specially designed to be printed, so there shouldn’t be any problems. However, these are big (probably a couple of weeks of printing for the whole set) models, and they should be printed in PLA in high resolution at moderate speed. You should also print them at higher than usual temperatures. Settings can be a bit individual for the printer.
I would advise trying to print some part that fits onto a square or rectangular aluminum tubing and trying to press-fit it. If everything will be ok, you can proceed with printing at these settings =)
Please don’t order printing or print all at once before trying if parts fit and are strong enough! Even then I recommend printing 1 peripheral and then trying to assemble it.
Just to clarify my question on the amount of PLA. I see you specify one roll for most of the peripherals. But I see rolls come in different sizes from 1/2 kilo to 1 kilo and up.
Cheers
Hans Jørgen
Ah, I see what you mean. 1kg rolls are more or less standard rolls at where I live, so I meant them =)
The actual amount of plastic depends on whether every print will succeed or something will go wrong and some parts will have to be reprinted twice or even more times. This is especially noticeable on big parts like pedals frame (around 300g of plastic), that print for like 20h. Good thing, there’s only a few of such parts.
Sometimes its ok, sometimes nozzle clogs, sometimes there’s a power failure, etc. Sometimes you change something in your printer and only notice problems when you begin to put things together and have to reprint with different settings. That’s why I always exaggerate the needed amount. If everything goes well, you may only need something like half of it.
You can look up an exact quantity needed for each part in slicer software (something like simplify3d or slic3r or cura). Slicer software is needed to convert STL files into machine-readable gcode, its where you select print settings.
Cheers
Hi again.
Well, Alexey. You sure got me something to obsess about. That’s for sure. This is a whole new world that I kinda was aware existed but didn’t really relate to. Until I came across your simchair procject.
Since I read your last answer I’ve been researching cheap (and not so cheap) 3D printers across the web and on AliExpress. I find a printer on Ali and then I google for reviews. There sure are a lot to choose from. So many that I feel slightly overwhelmed.
I think I am to leaning towards something open source, i3 prusa based, like you recommend. But apart from that my research have left me with more questions than answers.
The major question is of course how big a build volume I would like to have. How much volume would I need to print your parts? Just to have a starting point.
I have been assembling 3D printers in an excel-spreadsheet, just so I would keep track of what I had looked at and the price points of each. I have drooled over the Tevo Tornado, with it’s build volume of 300x300x400 mm but that’s getting a little up in the upper range of what I can afford. I need to keep some money for filament and hardware for the controls too.
And it has some issues that I would have spend money to implement fixes for. Unless the new motherboard actually fixes the salmon skin issue and the z axis error the old one is notorious for. Still, it’s one hell of a printer.
Then I started looking at the Anet 8 and 6 models again. They have their issues but they are cheap and for that price I can live with having to fix them myself. And it’s fun to tinker too.
And then I discovered this one: https://all3dp.com/1/anet-a8-plus-review-3d-printer-specs/. The A8 Plus with print volume of 300x300x350 mm. Granted, its about 900 kroner more expensive than the A6 autolevel, but it seemingly has improvements versus the A6 that would have costed time and money to implement on the A6 to make it safe.
Like the upgrades that ensures the Pro is not the fire hazard the A6 and A8 are. Plus the extended print volume that I probably would have had to do a very extensive rebuild with a new frame to achieve. Probably costing me more than 900 kroner in parts for that extension alone, with postage and import taxes. And it’s cheaper than the Tornado by 1000 kroner without loosing much of print volume compared to the Tornado.
And it’s also 1000 kroner less than the Flash Finder, while being way more printing tool for the money. I can’t wait to see that beast reviwed.
Also I might have it shipped to a friend in the States and have him bring it here as luggage. Then I won’t have to worry about import taxes and freight cost. That brings the price down to about 2500 kroner, or USD 299. Which seems like little money for that much printer.
Another question is where to source the other parts that can’t be printed. I have googled 10×20 mm aluminium tube in Norway and so far I haven’t found anyone who sells that kind of stuff in less than wholesale quantities.
I guess that’s an advantage to living in Russia with 144 million people vs. Norway with five and a half million. And living in Moscow with 12-13 million people vs Trondheim with 150 thousand inhabitants.
More people makes for a bigger market, even for stuff that not everyone are normally interested in. Big enough that someone can live from selling it in detail instead of wholesale.
Also Norway have been taken over by the chain stores big time during the last years. The old fashioned hardware stores that used to have that kind of tinker stuff are no more. Now it’s all big chains and the once hardware chains are now household and interor chains. That sucks.
The last independent hardware store in town closed some twenty years ago. Because the owners were old and wanted to retire and their kids didn’t bother to follow in their steps.
Oh, well. I guess I will be able to find the tubing and other stuff if I look long and hard enough. I know a guy who works with the visual design of gas stations all over the country. He might have some stuff I can buy from him.
I guess I could get some slicer software and get to know that part of the world before I get far enough to actually decide to get a printer and suggest that it may be my birthday present that both I and my wife can have fun with.
Which one should I start looking at? You mentioned simplify3d, slic3r and cura. Are they the best open source ones?
Cheers
Hans Jørgen
My printer has the build volume of 200x200mm, its fine for most stuff. Sometimes you want a bigger build volume, but then not everyone has these bigger printers, so I thought about that carefully and decided that it would be better to avoid non-standard parts completely. If I need larger parts, I just design an assembly =)
Stiffness may be an issue with bigger frames. For example, my friend bought an oversized p3steel frame for a 300×300 table, and although it prints quite good (no or little visible difference in prints compared to my printer), it feels a lot less rigid than mine.
Bigger table = more heat loss, more power needed, heavier table (thus slightly worse print quality).
I would avoid Anet A8 (non-plus) because its frame looks really subpar compared to A6 one. Also, it seems like A6 and non-plus A8 are both acrylic, not steel, so probably the aluminum plus version will be the best option. I really don’t like the design of an extruder in A6, I can see a lot of pain repairing it if (when) that cooler stops because of a faulty bearing and you will not notice it, or if there will be a clog in a thermal barrier radiator.
There’s another design, a delta printer, which may not be that good as a first printer, but (in theory, if tuned properly) can print better (or faster) than a cartesian one. I don’t recommend going this way for a start though =)
About fire hazard, I wouldn’t worry too much. My printer often works 24/7, so I’ve seen a lot of things going wrong. Basically, if you use Marlin firmware, it will simply disable the heater should something go wrong. If not, it will melt plastic parts and probably will end up on the glass of the heat bed, heated to a few hundred degrees, not enough to ignite something. It will be back and running after a few repairs. You can probably place the printer onto something that’s not flammable and it will be fairly enough. Not sure about acrylic stuff though.
Have you thought of laser cutting the steel frame locally, and buying some motors with RAMPS + Arduino kit, and some extruder separately? Assembling the whole thing by yourself (not just putting stuff together, but flashing the Arduino board with firmware, configuring it) is probably the best option: you won’t be afraid of breaking something. The steel frame really is the best one you can find. The original design is very strong and rigid.
Just look at how beautiful it can be:
https://reprap.org/mediawiki/images/4/46/P3sTE_MK2.jpg
My workhorse looks nowhere near that nice (never had time to do all these upgrades since I’ve built it), but it works as good =)
Or there are a lot of offers on eBay. Though knowing that everything you need is right there in the box may be better in your case of limited hardware availability.
As for missing hardware for crafting simchair, don’t worry, I can send you everything you need if you won’t find parts locally =)
Cheers!
-And now I have installed Cura and downloaded your files and looking at them for the first time. Cool!
Cheers
Hans Jørgen
Thank you for your input. It was very helpful.
Isn’t this typical novice behavior? Not really knowing what to look for and then focus on what is most visible. Like the print volume.
-And completely forgetting that the key concept here is CNC. A 3D printer is just an inverse mill. And in CNC work stability and rigidity of the rig is paramount for good results.
Now that I know that I really don’t need a bigger bed than 20×20. That narrows down the focal point a bit and also widens the possibilities.
There are a lot of printers out there with those dimensions. And the prices for those are more in my range. I might even look into your suggestion of building it myself. That would be fun. Kinda like my first PC, back in 1986. I loved tinkering with that thing.
Before I got it I started studying computing and we were working on a VAX PDP mainframe, running VMS. And I was so afraid of doing something wrong and wreck something that I was almost paralyzed. That changed when I got the PC AT.
The only person that could yell at me if I screwed it up was your’s truly. When that wasn’t an issue it was easier to learn stuff. I ended up working support at the university and after several years of having my hobby as my work my hobby wasn’t that fun anymore. I kind of lost that joy of tinkering with PCs.
Later on I moved on to other kind of computer related work but I never fully regained that childish joy of tinkering with PCs.
That Toolson Edition MK 2 is a gorgeous machine. I found his blog and looked at the parts list. Doesn’t look all that hard to get and assemble. I guess the biggest challenge is to 3D print the 3D printed parts without a working 3D printer.
Next after that the biggest challenge would be to get enough knowledge to be able to understand what I am doing when I try to flash and calibrate the printer.
I found a Spanish site with seemingly excellent quality i3Steel frames. Orballo printing. They charge 60 euros for the frame plus 20 euros for shipping. Add Norwegian import taxes and the handling fee to the carrier for doing the paper work and we’re close to 1200 NOK. Just for the frame. Before we start adding steppers, rods, electronics, extruder, printer head, and so on.
I guess when we add all that we’ll end up in the ballpark of the price of the Ender 3X or 3 Pro. -Or the Anycubic i3 Mega. Even if that one is a little more expensive. Still it’s all metal and look like it was designed and built by Uralvagonzavod. So it might be worth a second look. Especially now that I know that the 210x210x205 mm build volume isn’t really negative but instead contributes to sturdyness.
Thank you for your kind offer of helping me with the stuff for control parts that I can’t get locally. I will take you up on that. I am very sure of that. 🙂
(And damn the chain stores to hell, -and their narrow choice of things they think they can sell us in big volumes).
That’s my thoughts so far. I guess I should stop obsessing and get some sleep. 😉
Cheers
Hans Jørgen
Yup, that Anycubic I3 looks quite good, looks like the frame is all metal. You’re right, with all these Chinese printers around building a printer from scratch can be more expensive =) With hardware availability problems you described buying a kit definitely makes sense.
You can download Marlin firmware and read its configuration manual =) It’s not that hard to configure in fact. If you’re familiar with programming it shouldn’t be a problem at all (programming itself is not involved in any way, just need to uncomment a few lines and comment out some others, that’s it). Then you do some tests and adjust values, and do so until it works as intended. Nothing complex really =)
Yes, it seems like the Anycubic people have paid some attention to detail, at least. Since we last spoke I have seen some mixed reviews on the durability of the parts. Both people who have gotten printers that was dead on arrival and people who have had the printers break down after a few hours. So it’s (relatively) inexpensive and it’s Chinese parts quality.
That Marlin firmware tip sounds interesting. I also see there are people trying to build their own “Prusas” from individually sourced parts. Like this one: https://toms3d.org/2017/02/23/building-cheapest-possible-prusa-i3-mk2/
And this one: https://shop.prusa3d.com/forum/general-discussion-announcements-and-releases-f61/i-made-custom-scratch-built-mk3-clones-and-yes-you-t15658.html
Something like that might be achievable, given I find some patience and don’t want to do everything at once. 😉 (Like I usually do). So maybe your suggestion isn’t that out of reach after all. It will just be a long time project, instead of “instant gratification”.
And it also would give me more control over the overall quality as well as make me able to repair it myself if something breaks down. I think I will have to look more into that. 🙂
That’s what I am talking about, it’s probably better for your first printer to be open source and built by yourself so you won’t be afraid of things going wrong!
Btw look at the core-xy type frames:
https://www.tomsguide.com/us/monoprice-maker-select-ultimate-3d-printer,review-3922.html
https://www.aliexpress.com/item/2018-Newest-Flyingbear-P905H-DIY-3d-Printer-kit-Full-metal-Large-printing-size-High-Quality-Precision/32847075621.html
It should be free of some Prusa’s problems (heavy moving table regarded).
Wow. Those look really sturdy.
I came back to show you this one, that I came across. http://www.trustfm.net/hardware/3DPrinter.php
That definitely looks doable as a first step. Once we get our garage cleaned out of crap that is supposed to go to the cottage I get access to my carpenter tools. Hopefully this summer. Then I will be able to make a sturdy plywood frame to put the hardware in when I finish sourcing it.
It won’t be cool looking but it will at least be functional. Which is probably what I should prioritize for starters anyway. And I can always paint the plywood to make it look a little better.
Later on, when I get enough money, and if I feel the need, I could swap the plywood frame for a metal one.
What’s your take on that idea?
Really, really bad idea! Avoid plywood, at least go with acrylic (a bad idea too, but nothing’s worse than plywood!)
I strongly recommend you to stick to at least original aluminum i3 design. Especially in a garage where air humidity fluctuates. But then, a p3steel frame will be a lot better. Look at other core-xy type designs, like this one:
https://www.youtube.com/watch?v=jh_qgU5XZfE
It should be more lightweight thus cheaper to import.
The rigidness of the frame is really everything. We’re talking about microns here! =)
Yes, I guess you are right. Wishful thinking won’t make wood stable in micrometer tolerance situations. Not even if I keep it in the house instead of in the garage.
Oh, well. Back to the drawing board. I have earlier been able to get 6mm aluminium scrap pieces at a factory that specializes in laser cut and water cut of steel and aluminum. Maybe I can at least ask them how much they would charge to cut the frame profiles. Probably too much for my wallet but if you don’t ask you will never know.
Failing that. Maybe I can get aluminum scrap pieces that are big enough and shape them myself. I just watched a guy on YouTube routing aluminum to shape with a home made wooden jig and a handheld router. I’ve got a router so it might be fun to try.
How about building something like this:
https://www.thingiverse.com/thing:2254103
Are aluminum profiles a problem to find/import as well as a heavier steel frame?